ShareWay IP Gateway User's Guide
Getting Started
System Requirements
- 68030 or better, or a Power PC, on the ShareWay IP Macintosh.
- System 7.5.3 or later on the ShareWay IP Macintosh.
- Open Transport 1.1.2 or later on the ShareWay IP Macintosh.
- AppleShare Client 3.7 or later needed on client machine for AppleShare
access over TCP/IP.
- A TCP/IP network, or Internet connectivity, between the ShareWay IP
and client machines. ShareWay IP's TCP/IP connection must be over Ethernet,
any AppleTalk network supporting TCP/IP using MacIP, or TCP over dial-up
using PPP.
- 300KB RAM for Personal Edition
- 1200KB RAM for Standard Edition
- Standard Edition - An AppleTalk network between the server and ShareWay
IP machines, if the server and ShareWay IP are on different machines.
- Standard Edition - Any AFP 2.1 or later server (includes Mac OS personal
file sharing, AppleShare 3 or 4, Macintosh Services for Windows NT Server,
etc.)
Pre-Installation
ShareWay IP Personal Edition must be installed on the same machine as the personal file sharing server it is supporting, as shown in Figure 1 below. ShareWay IP Standard Edition can be installed in one of two configurations:
- Install ShareWay IP on the same Macintosh as the server. In this case the machine need not be connected to an AppleTalk network, only to a TCP/IP network. See Figure 1 below.
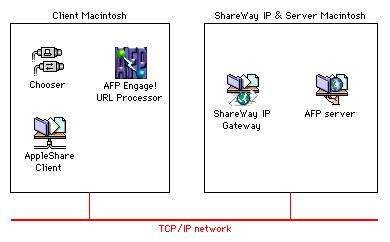
Figure 1. ShareWay IP (Standard or Personal) and server on same machine
- Install ShareWay IP on a different machine than the server. The two machines must be on either the same AppleTalk network or interconnected AppleTalk networks. In addition, the ShareWay IP machine must also be on a TCP/IP network. This three-machine configuration is required for support of non-Macintosh servers, since ShareWay IP cannot be run on the server machine in this case. See Figure 2 below.
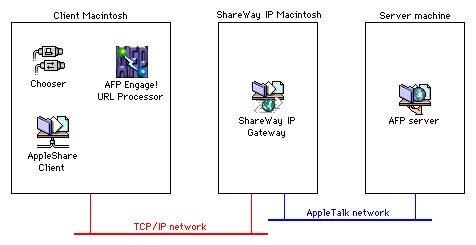
Figure 2. ShareWay IP Standard and server on different machines
Note that in both configurations the AFP Engage! URL Processor is optional, but may be used as a convenient, powerful method of accessing AFP servers. See Using ShareWay IP. Note also that any user wishing to access a server targeted by ShareWay IP must have AppleShare Client 3.7 or later installed.
Installation
Standard Edition - Once you have decided which Macintosh to install ShareWay IP Gateway on, install it by simply dragging it to the hard drive of that Macintosh.
Personal Edition - Drag ShareWay IP Gateway to the hard drive of the personal file sharing machine you wish to make available though the Gateway.
Setup (Standard Edition)
Before beginning ShareWay IP setup, take the following initial steps:
- Confirm that the server and ShareWay IP machines' AppleTalk is active
and configured for the correct network. Confirm this using the AppleTalk
control panel on each machine.
NOTE: Even if you are running ShareWay IP on the same machine as the server, ShareWay IP requires that AppleTalk be active on that machine. If there is no physical AppleTalk network connected, you can choose any AppleTalk interface, including Remote Only (available if ARA is installed). - Confirm that the ShareWay IP machine's TCP/IP is active and configured for the correct network. Confirm this using the TCP/IP control panel on the ShareWay IP machine.
- Make sure the AFP server is running.
- Make sure that the client machines' TCP/IP is active and configured.
Begin setup by launching the ShareWay IP application. You will be prompted to enter a serial number. If you do not enter a valid serial number, your copy of ShareWay IP will only run until 10 days from the date you first ran it. To enter a serial number, click "Enter Serial Number...", enter the serial number and click OK. To use ShareWay IP as a temporary eval version, just click OK. See Serial Numbers in the next chapter for details on serial numbers.
The status window appears as shown in Figure 3.

Figure 3. ShareWay IP Standard status window, ShareWay IP inactive
Note that when ShareWay IP is first launched, it is inactive. Before starting it for the first time, you must specify a target server -- the server with which ShareWay IP will communicate. This is done in the Target Server section. There are two basic choices:
- Server on this Macintosh - This is the default. ShareWay IP
will communicate with the AFP server on the same Macintosh as itself. This
Macintosh does not have to be connected to an AppleTalk network, but AppleTalk
must be active.
- Server on AppleTalk - ShareWay IP will communicate with an AFP
server on the AppleTalk network or an interconnected AppleTalk network.
To select a server, click the "Choose..." button. A window appears
as shown below in Figure 4. If zones appear in the list on the left, select
a zone. Then select a server from the list on the right and click "OK",
or double-click a server. The target server must be available on AppleTalk
before it will appear in the list.

Figure 4. Selecting a Server on an AppleTalk Network
Note that ShareWay IP Standard Edition can communicate with only one AFP server at a time. When you have selected a target server, you can start ShareWay IP by clicking the "Start" button. The server will not be accessible over TCP/IP until ShareWay IP has been started, and will be made inaccessible again by clicking the "Stop" button, quitting ShareWay IP, or shutting down the Macintosh where ShareWay IP is installed. ShareWay IP's status (active or inactive) is saved between sessions.
Setup (Personal Edition)
Before beginning ShareWay IP setup, take the following initial steps:
- Confirm that the ShareWay IP machine's AppleTalk is active and configured
for the correct network. Confirm this using the AppleTalk control panel.
NOTE: If there is no physical AppleTalk network connected, you can choose any AppleTalk interface, including Remote Only (available if ARA is installed). - Confirm that the ShareWay IP machine's TCP/IP is active and configured for the correct network. Confirm this using the TCP/IP control panel.
- Make sure personal file sharing is running.
Begin setup by launching the ShareWay IP application. You will be prompted to enter a serial number. If you do not enter a valid serial number, your copy of ShareWay IP will only run until 10 days from the date you first ran it. To enter a serial number, click "Enter Serial Number...", enter the serial number and click OK. To use ShareWay IP as a temporary eval version, just click OK. See Serial Numbers in the next chapter for details on serial numbers.
The status window appears as shown in Figure 5 below. Start ShareWay IP by clicking the "Start" button. The server will not be accessible over TCP/IP until ShareWay IP has been started, and will be made inaccessible again by clicking the "Stop" button, quitting ShareWay IP, or shutting down the Macintosh where ShareWay IP is installed. ShareWay IP's status (active or inactive) is saved between sessions.

Figure 5. ShareWay IP Personal status window, ShareWay IP inactive
Starting ShareWay IP At Boot Time
To have ShareWay IP start automatically at boot time, put an alias to ShareWay IP in the Startup Items folder. The Gateway will launch in the same state it was in when it was last quit or when the machine was last shut down. The Gateway's state includes the choice of target server and whether the Gateway is active or not.
Note: both personal file sharing and AppleShare can take a few minutes to start up at boot time. It will thus take a few minutes after restarting for these servers to become available through ShareWay IP if they are on the same machine as ShareWay IP.
Accessing the Targeted Server
The most straightforward method of connecting to the Gateway-targeted server is through the Chooser. On any client Macintosh, select the Chooser from the Apple menu, and select the AppleShare icon. Click on the "Server IP Address..." button, and enter the IP address of ShareWay IP, as displayed in ShareWay IP's status window. Note that this is the IP address of ShareWay IP, not the server. When you click on the "Connect" button, ShareWay IP's targeted server will be accessed and the standard AppleShare login process will begin.
Other methods of connecting to Gateway-targeted servers are covered in Using ShareWay IP.